Monday, February 11, 2013

DIY Non-Marring Hammer with an Old School Twist

When disassembling furniture for repair, it is important to keep the parts in pristine condition so when reassembled you can make the piece look brand new.  Sometimes softer woods have a habit of very easily taking dents or nicks.

I ran across a situation the other day where I was disassembling a piece of knotty pine furniture and needed a non-marring hammer to break apart glued joints.  I started by using a rubber mallet, but had to stop when I found it left some dents in the wood.  Wanting to preserve the pieces in their original condition, I knew another solution was out there.

I recalled a while back reading up on furniture restoration, a hammer wrapper with rags could be a substitute for a non-marring hammer.  This sounded like a good time to put it to the test.


To make my hammer, I used:

- 3 pound sledge hammer (or other hammer with flat ends)
- 8 shop rags
- 1 large zip tie


Step 1


Lay all 8 rags flat and place the hammer in the middle.

Step 2


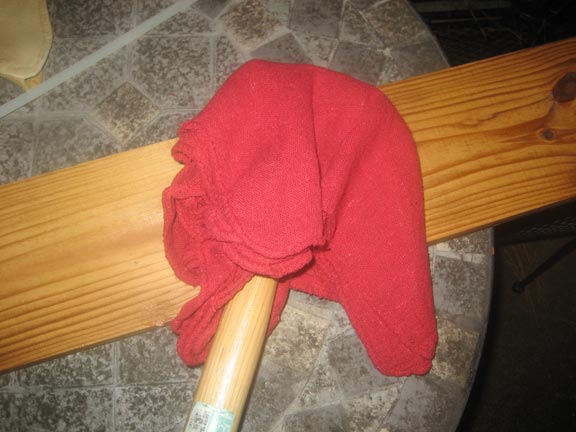
Wrap your rags as evenly as you can around the head of the hammer.


Step 3


Put a zip tie around the rags as close tot he head of the hammer as you can.  To tighten it very tight, use a pair of pliers to pinch near the excess zip tie material and rock it back and forth.  After it is snug, cut off the end of the zip tie.


To my surprise, this hammer left no dents or marks in the wood even though I swung it very hard.  Making it took less than five minutes, but the best part is it was made for free with things most of us already have lying around our garage.


Tuesday, January 15, 2013

Removing Rust with Electrolysis

In a recent post, I talked about the benefits of hand tools and how there are some really good finds out there to be had.  Let's say you are looking at some tools at a yard sale, thrift store, or other second hand shop, and you find something you are really interested in purchasing.  After testing it out, it seems to suit your interest very well, except it is covered with rust.  A little surface rust is no big deal, some steel wool and an oil-based lubricant will clean it up very well.  However, major rust can be a real downer on a prized piece.


I recently came across an anvil that my grandfather frequently used long before Ronald Reagan entered politics.  After he passed away, my grandmother had covered it with water-based yellow and used it as a conversation piece in her garden.  Left untouched for many years, the surface rust was considerable.  After some research, I considered electrolysis to be my preferred choice of rust removal.


Taking proper precautions, electrolysis is very simple and is one of the most environmentally friendly methods of rust removal.


Why Electrolysis?


Electrolysis would remove not only the rust, but also all paint on the anvil, leaving a nice shiny bare metal surface.  In addition, electrolysis would give me much greater control over how much material would be removed and how evenly I can remove it.  With a wire brush I would be challenged to leave the smooth surface I desired, and although chemical rust removers may work well, getting into the small crevices and hard to reach places could present a challenge.


Precautions


Remember, as the name "electrolysis" suggests, you will be working with electricity.  If that makes you uneasy, stop and find another method.  I really suggest having a commanding knowledge on the basics of electricity before you go any further.


Second, there are some mild chemicals involved with this process.  While there are no strong acids, we are using washing soda, which could cause irritation or more severe problems if it comes in contact with skin or eyes.


You should take proper precautions when dealing with any chemicals, including proper clothing, eyewear, proper ventilation, and chemical resistant gloves.  The chemical reaction will make hydrogen gas, which can be flammable.  Never do this near pilot lights or any other type of fire or flame.

In addition,  while you may understand the intricacies of this operation, it is important this process be done in a secluded area away from others who may not understand its danger.  Children and animals should remain away from this area for the entire process.  My dog has a habit of eating cat poop, so I could imagine her trying to drink the water if given the opportunity.


Not for All Tools


While electrolysis is a great method of rust removal, it is not for all tools.  I would not suggest sticking anything which could be damaged by water into solution.  Any types of wood, basic electronics, or moving parts must be removed.  This method effectively works best for bare metal.  Some disassembly may be required to efficiently clean your tools.  


The Setup


For assembly of the electrolysis tub, gather the following supplies:
  • 12 gauge wire
  • steel rebar
  • scrap steel wire
  • plastic 10 gallon tote
Cut fours pieces of  rebar that are 1-2 inches longer than the height of your plastic tote.   To secure these as posts in the four corners of the plastic tote, drill two holes near the top of each corner, loop the wire trough the holes and around the post, then twist the ends together snugly.

After the posts are secure in each corner, take four pieces of copper wire and strip about two inches off each end.  The wires should be slightly (25-50%) longer than the full length of your plastic tote.   Wrap one end of each wire securely around the top of each rebar post, then twist all four ends together at the top, forming a pyramid shape with the wires.  These wires must stay above your electrolysis bath during the rust removal process.  Congratulation, you just formed the anode, which will connect to the red clamp on you battery charger.

Now you will create the cathode piece, which will connect your work to the black wire.  The best method I found is to suspend your rusted metal in the water with a bare copper wire wrapped around it.  In the picture to the right, I wrapped the anvil in bare copper, then secured this wire to the white wire, wrapped the 1x2 scrap of wood.  Fill your tote with water, and one tablespoon of washing soda per gallon.  Stir it up and completely submerge your rusted tool in the solution.


Turn On the Juice


Be sure your battery charge is unplugged.  Connect the red clamp to the twisted wire at the top, or the anode.  Connect the black clamp to the wire leading you your rusted metal.  Now get ready for the magic to happen and plug in your battery charger.  I used the setting for 2 amps on 12 volts.  Stand back.  Wow . . . really . . . nothing?  Do not be fooled, it's happening, but very slowly.  Do you see bubbles forming on your tool?  That is hydrogen gas escaping.  The first time I did this, I didn't see the bubbles.  So I added more washing soda, with the battery charger turned off of course.  When you see the bubbles, you know it's working.  Now, don't touch the water and leave it alone for a while.

Check it every hour or so.  Is there muck floating on the surface?  Then the electrolysis is working and the rust is coming off your tool.  In my case, the paint was coming off as well.  After about four to five hours, I cut everything off, pulled the anvil out, and gently scrubbed it with a steel brush.  The bare metal underneath was now showing.  I dropped it back in the solution and plugged everything back in.  Every hour or so after this, I pulled out the anvil and brushed some more crud off until I had a really clean final product free of paint and rust.


Over 40 years later and the anvil was looking great and ready to use again.  The last step of any electrolysis rust removal is to prevent future rust.  Paste wax, linseed oil, laquer, or whatever method you wish is fine.  I put a decent coat of AmsOil to make this anvil project complete.  You can also save the solution after you are done, and reuse it on future projects.


New Life


As previously mentioned in The Importance of Old Hand Tools, the durability of hand tools over 30 years old is very good.  With electrolysis as another weapon in your arsenal of antique restoration methods, you can safely and efficiently remove rust from many classic pieces.  Find your next gem in someone else's rusted pile of long forgotten tools, bring it back to life, and put it to use in your own shop.




Friday, December 7, 2012

The Idle Woodworker Blog was Featured on About.com


I would like to thank Ryan Kunkle from the Railroad Museum of Pennsylvania for featuring my Christmas Platform blog post in his About.com Model Railroad Blog a few days back.  Ryan has some great articles regarding designing and setting up very aesthetic model railroad scenes.

A big reason any I began blogging at the end of last year was the limited information available for certain projects, such as a Christmas Train Platform.  By sharing information and things I have learned, I was hoping to inspire others in their own projects.  

Keep an eye out for upcoming posts as we finish up 2012 and head into 2013.  

I promise to finish the Depression-Era Vanity I introduced you to back in June, as well as test drive and review a hand saw the Great Neck Tools company will be sending my way.  A few other things in the works are farmhouse-inspired kitchen pieces I designed, removing tool rust with electrolysis, and some tools I originally thought were limited, but now cannot live without.

As for the Minwax Facebook contest, I did not win the big trip, but still receive a great consolation prize.  Congrats to Tom P. of Indiana, PA for his truly wonderful restoration of a family heirloom grandfather clock.  I really appreciate all of your votes, it is wonderful thing to know your work is truly appreciated.

Tuesday, November 27, 2012

Shop Safety - Which Safety Glasses are the Best?

I once asked a wise and experienced wood worker, "Which safety glasses are the best?".  His answer was simple - "The ones you wear."

If you've ever tried using an uncomfortable pair of safety glasses, then you completely understand the answer.  You got to a store, look at all the safety glasses in their blister packaging, and wonder two things - are they safe and how much do they cost.  You accept since they are protective eye wear, they may not be the most comfortable glasses you have ever worn.

But recently, I stumbled into my local Woodcraft store in the Norfolk/Virginia Beach area and ran across a display for their safety glasses.  I have been looking for a good pair for some time now and willing to shell out $20-25 for a comfortable pair.  They had samples to try on, which was a welcome addition to the standard guesswork.

Fastcap Safety Glasses
What a difference in the feel of these glasses and other eye protection I have worn.  They not only are comfortable, the way they wrap around and contour my head give me an unobstructed view and good protection from flying debris.  And at $6 a pair, it was a price that wouldn't break the bank.

Online Woodcraft Fastcap Safety Glasses Page

On Sunday I had some modifications to my lumber storage to make, so I tried them out.  Comfortable and good protection, as I had expected.  Two thumbs up for safety, and a choice I can comfortably work with in the shop.


For those who are interested in additional options, Fastcap safety glasses at Woodcraft come in clear, dark, amber, mirrors, with bifocals, and as googles.


Wednesday, November 14, 2012

Building with Pallet Wood other types of Reclaimed Lumber

There are many times woodworkers search for alternative sources of lumber to get the look, texture, or pricing they desire, since the conventional sources of wood may not easily give the desired end product.  When trying for a vintage look or working within a desired budget, these secondary choices can supply a plethora of wood that cannot be found at your big box home improvement store.

On a recent post, I discussed building a project out of pallet wood.  Pallet wood and other sources reclaimed lumber can give a project a great vintage look, but there are a few cautions your should follow whenever selecting and working with it.  For the purposes of this article, I will break down the category of reclaimed lumber into two groups, newer lumber and old lumber.

New Lumber

Newer lumber was harvested within the past 10 or so years and can be easy to find and very inexpensive.  In fact, most sources are completely free, providing you supply the labor and transport.  The best example of this is pallet wood.  There are so many books, websites, and other sources out there reclaimed covering pallet wood construction projects.  As a matter of fact, a Google search of "pallet furniture" results in almost 2.5 million web results and almost 3 million web images.  Its popularity is without question - free wood is a hot trend in today's questionable economy.

However, it would be best err on the side of caution when building with pallet wood.  Many times pallet wood is treated with insecticides and herbicides, and may be contaminated with bacteria if it as used to transport food.  I personally would never build something to go inside my home.  Additionally, if you build anything meant for children or animals, it is best to use another type of lumber.  A good example of what I feel comfortable using pallet wood for is the Halloween graveyard fence project.  Not all pallet wood is harmful, but it is near impossible to determine which wood has been treated and which is untreated.

Old Lumber

Old lumber can be very old, even dating to the 19th century, and may have once been siding or structure of an old building.  Sometimes old barns or sawmills may have lumber stored in them, or the reclaimed would can come from boxcars, mine shafts, or flooring.  Pine and oak are most common in my state, Virginia, but other areas of the country may have different species of wood.

Old lumber is a great source of well seasoned wood, but it is not without hazards.  Sometimes insect infestations, wood rot, mold, and fungi have ravaged these buildings.  In addition, many of these old building were painted with lead paint.  Although the painted surface may have a great patina and show a well worn look, I personally would not construct anything with still had the original lead paint on its surface.  I also would never construct anything for children made from this wood.

Rough Sawn and Full of Nails

All reclaimed number may have instances where nails and a rough cut surface would exist, so it is best handled carefully with work gloves.  It is best to plane or sand the wood to a smoother surface if you expect frequent contact these pieces.  Again, for a Halloween decoration in your yard, rough cut may be great, but for a bench it will be best to have a smooth, splinter-free surface.

Before cutting, planing, or drilling, you will definitely want to remove any old nails or fasteners.  Tap them with a hammer on the sharp side and use scrap wood to get good leverage and protect your product when prying them out with the claw of your hammer or pry bar.  Run a metal detector over the wood and make sure there isn't anything left behind.  Sometimes the heads of old rusted nails may break off and get stuck in old lumber, leaving a damaging and dangerous situation when working with power tools. These can be removed by tapping them out  from the backside with a small punch.

Specialty Woods

In some cases there are specialty woods which may be salvaged for their grain, color, hardness, resistance to rot, or possibly another reason.  A good example would be Teak, which is often used outdoors and on boats for its resistance to rot.


Friday, November 9, 2012

Please Vote for the Tool/Blanket Chest Conversion

Great news - yesterday I found my Depression Era Blanket/Tool Chest Conversion project was chosen by a panel of judges as a finalist in the Miracle Makeover Contest by Minwax.  If enough Facebook users vote for my project, I will win a trip to Ashville, NC for a private lesson with Bruce Johnson, a master furniture refinisher, a piece of unfinished furniture, and some Minwax product to finish it.

I appreciate the judges selecting my project as a finalist in the Minwax contest.  Very humbling, indeed.

If you want to read about the entire conversion you can read the individual blog posts:

Depression Era Tool Chest Conversion Part 1 - Part 2

If you have a Facebook page and would like to vote for me, I would certainly appreciate it.  You can vote once a day, every day until November 18.  I won't complain if you decide to vote more than once.

You can follow this link to my entry in the contest:

Minwax Contest Entry - PleaseVote
(Link has been removed that the contest is now over.  Thank you for your votes.)

Wednesday, October 31, 2012

Easy Halloween Graveyard Fence

What would your front yard be like on a creepy Halloween night without a graveyard?  A collection of tombstones with a fence out front makes for the perfect trick-or-treating ambiance.  Tombstones can be made or found very cheap at any drug store chain.  To add a little extra something, you can nail two boards together and make crosses to stick in the ground as well.

My Halloween fence was very easy and very inexpensive.  In fact, after it was all said and done, making them took only a few hours and cost me only a few cans of spray paint I had sitting in my garage and about $6 in conduit clamps from Lowes. Even the wood, which can be obtained from shipping pallets, can cost nothing.


Cut angles at the top of your pickets

Step 1 - Cut and Arrange Your Fence Pickets

I started by taking five boards and cutting them at an angle near the top.  It really doesn't even matter exactly what angle you choose, just be somewhere between 30 and 60 degrees.  The randomness of your angles add extra effect to the final product.  Arrange your pickets similar to the drawing to the right.


Basic fence before finishing

Step 2 - Add the Fence Rails

Then I take two slightly longer boards and lay them across the original boards as your rails.  Exact dimensions are not necessary, eyeballing everything is good enough for Halloween decorations.  You may even choose to lay these boards at a slight angle.  After you have everything laid out, nail the boards together.  I used a total of twenty 1 1/4" nails in total.


Pound the stakes in, the slide the straps over them

Step 3 - Add the Stakes

The first time I made these, I pounded wood stakes into the ground and screwed the fence to them.  I thought it was a great idea, but it was a bear getting things lined up properly and securing everything.  Then I came up with the idea of using conduit straps.  By lining up 1/2" green steel garden stakes with the straps, I found this very secure.   The strap/stake concept I used held my fence sections firmly in the ground during Hurricane Sandy this year.

Line up your straps and screw them halfway in.  Pound your stakes in, then slide the fence section down over the stakes.  Tighten the screws on the straps for a good grip. 


Spanish moss adds a nice "aged" touch to the fence

Step 4 - Paint and Decorate Your Fence

To paint this fence, I used a combination of green, black, beige, and brown.  First, I sprayed each color in a large camouflage pattern, using some of each color.  It looked pretty cheesy, but that was only a base coat.  Then, using the darker colors, I sprayed a light mist or black and brown over the whole fence.  It gave it a nice aged look. I finished off my fences by stapling a little Spanish moss or wrapping ivy vine cuttings around the pickets.


Make two, three, four, or as many as you want.  You can start out small and add a few more fence sections every year.  They store flat and out of the way, making this a no-brainer for reusable Halloween yard decorations.  I currently have six in my front yard and am ready for my trick-or-treaters to show up again this year.